The Tartine Country Loaf is as much a versatile bread as a road map to sourdough bread in general. Every recipe of sourdough in Chad Robertson's, and by extension my, repertoire seem to use the same basic formula as his Tartine Country Loaf. He spends over 40 pages in his book describing how to make it and references it in all his following recipes. One should read through this recipe before attempting other sourdough bread recipes.
Tasting and Pairing Notes:
- Thick, dark, crunchy, 'shattery' crust
- Chewy interior with large unevenly uniform crumb
- Pairs exceptionally with cheeses, fresh salad, roasted vegetables, steak, beef stews
Instructions:
Makes 2 large loaves or 3 small loaves.Minimum time: 6hr after levain
Ingredients:
- 1 kg flour
- 200 g levain
- 770 g water
- 15 g salt
Tools:
- 2 large mixing bowls, 1 medium size mixing bowl
- Scale (1g precision, 1 kg capacity)
- 1 large container for proof (plastic or glass is best)
- Surface to roll out (wood is easiest, but make SURE it is clean. A table is probably not clean enough)
- Bench knife (very strongly recommended unless using low hydration)
- 1 basket or bowl per loaf
- One kitchen towel per loaf
1. Making the dough:
 The important part is the proportions and making sure all the flour is
incorporated. The instructions give an easy and quick way of doing
so.
Combine all flours in a large mixing bowl. Mix well. Put to one side.
Measure water using smaller bowl. Transfer to empty large bowl
 Add
all of levain to large bowl containing water(or most if you want to keep some for the
next starter) and mix well by hand. No levain should be visible.
Add
all of levain to large bowl containing water(or most if you want to keep some for the
next starter) and mix well by hand. No levain should be visible.Add flour mixture to water. Do not mix. Let mixture sit for 1-5 minutes, then mix in light circular motions with fingers in a claw shape. Most of the mixing is done by the wrist.
 When
a good amount of the flour has been mixed in but the bottom of the bowl
is still fully liquid, scrape the edges of the bowl and incorporate the
flour build up.
When
a good amount of the flour has been mixed in but the bottom of the bowl
is still fully liquid, scrape the edges of the bowl and incorporate the
flour build up.Continue this process until all the flour is incorporated. Squeeze it through your fingers to make sure there are NO dry bits.
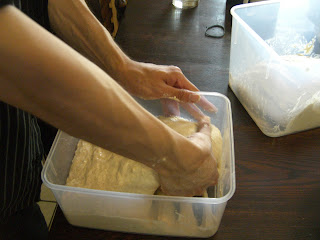
Give the dough a rough turn if you feel the need. Turns are addressed in detail in part 2. Basically, dig your hand under the dough and stretch it up and over.
Let sit for 30-60 minutes.

Add salt and 50 g water to the bowl and incorporate.
Give the dough another rough turn.

2. Bulk Fermentation:
We develop the gluten here. This is the most important step and the one that will determine if your bread is successful. Chad Robertson gives a nice description, nothing is a substitute for experience. Until then, experimentation is the easiest path to success.
 The
following instructions are for a single turn. Perform a turn every
half hour for the first 2 hours ( 4 turns) then let the dough sit for
30-60 minutes. Times are approximate; the feel is the important part.
The
following instructions are for a single turn. Perform a turn every
half hour for the first 2 hours ( 4 turns) then let the dough sit for
30-60 minutes. Times are approximate; the feel is the important part.Dig your hand under the dough. Do not penetrate the center: go from the edges.
 Working
quickly and decisively, lift and stretch the dough as high as you are
comfortable and gently lay it over the other half that stayed in the
container. If the dough was too stiff, pulling helps. If the dough is
too wet, moving quicker helps. If the dough is too tacky / sticky, let
if rest for longer in part 1.
Working
quickly and decisively, lift and stretch the dough as high as you are
comfortable and gently lay it over the other half that stayed in the
container. If the dough was too stiff, pulling helps. If the dough is
too wet, moving quicker helps. If the dough is too tacky / sticky, let
if rest for longer in part 1.Repeat the turn five or six times as you work around the dough. The dough should become harder and harder to stretch. Stop when you can no longer stretch the dough.

Be as gentle as possible. As you perform more turns, be more gentle.
When the dough feels lighter than before, you know you are close to finishing.
If you use a transparent container, you should see little bubbles on the sides.
If you want to add flax seeds, olives, herbs, etc, add them in the 1st or 2nd turn. Make sure they are combined well and dry when they go in.
1 - 1.5 c flax seeds is a good amount with whole wheat bread.
3. Dividing and Shaping, Part 1:
 This
will determine how pretty your loaves look. Proper shaping can save
the appearance of poorly fermented dough. Poor shaping will result in
flat, structureless dough with an uninteresting crumb. Do not be too alarmed if your loaves are not perfect here; there is still another set of shaping to go. The better your initial shape, however, the easier your real shape will be.
 Very
gently allow the dough to fall out of the container onto your surface.
If you are using wood or smooth stone, no need to flour the surface.
Very
gently allow the dough to fall out of the container onto your surface.
If you are using wood or smooth stone, no need to flour the surface.Using a bench knife, divide the mass of dough into two (or three if you want tiny loaves or if you added other ingredients during bulk fermentation).
Take one part. With the short side closest to you, fold the top third down towards you. Fold the bottom third up over that. Fold the right and left thirds likewise to the center and roll the dough onto your surface so the seam side is down.

Rotate the dough mound using the bench knife and your hands. Be decisive; the bread can sense your fear and responds by becoming stickier.
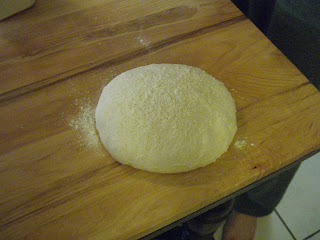
Rotate until the dough forms roughly circular mounds (circular in xy plane)
You may add a tiny amount of flour before you flip the dough if you are not using a wooden or stone surface.
Repeat for all other partitions of the dough.

Let the dough sit without cross breezes for 30-60 minutes. Do not cover unless there is a stiff wind or your room is dry; you want a slight hint of a crust to form to aid in the next step.


4. Dividing and Shaping, Part 2:
 We now build the tension and structure that forms the bread's scaffolding. A well shaped bread will rise better and give a more pronounced ovan spring. Make sure to work quickly and decisively. The bread can sense your fear.
Prepare baskets or bowls for bread, one per loaf.

Place towel inside basket. Flour with course flour (indian wheat flour is a good choice) and rice flour in roughly equal proportions.
Rub the flour into the towels.
Make sure to work quickly. If you move too slow, you will need to add flour to prevent the dough from sticking.
If need be, flour the top surface of the dough.
Using the bench knife, free the dough from the bottom surface. Move quickly and try to keep the loaves in circular forms.

Flip the dough onto the surface such that the seam in now face up.
Fold the bottom third up, the right third over that and to the left, and the left side over those and to the right. Stretch a fair amount; do not tear the dough.
Fold the top third down and the bottom third (not including the top third) over all of that. Pull and flip the dough such that the seam side is down.

This is the outer crust. You may now add as much flour as you desire.
Rotate and push and pull the dough on the surface. Try and build as much tension as possible in the surface of the dough. Be careful not to break the surface.
Repeat on all loaves. Dust all well with flour

Place loaves seam side up into the baskets. The seams should be barely visible. Dust well with flour and cover

5. Final Proof and Baking:
 The final proof is very flexible. My final proofs range from 1.5 hours at room temperature to 24 hours with refridgeration. If you remember how the dough feels and how it turns out, you will drift towards the correct times.
 Let loaves rise for 2-4 hours at room temperature or 3-12 hours in the fridge. It is useful to place the loaves in the fridge for 30-60 minutes before baking to develop a firm crust that makes scoring orders of magnitude easier.

To bake, place pots in the oven and pre-heat to 450-485. If convection bake, 450 is hot enough.
When oven and pots are very hot, take pots out. Flour the bottom very well. If you do not, the bread will stick to the bottom of the pots. If your pots are hot enough, the flour should start to smoke slightly.
Quickly flip the bread into the pots, seam side is now down.

Slice a pattern into the bread using a sharp knife (serrated is better if you do not have a very sharp one) or a razor blade (preferable).
Place the lid back on and put into the oven.
20 minutes cover on, 20 minutes cover off. Keep baking until the bread reaches the desired color.

When you take the bread out, make sure to scrape off the flour from the bottom before you serve. It is good to wait 10-30 minutes before slicing into the bread, but it is not strictly necessary. The texture changes considerably if you do not wait (more custardy, less chewy).


No comments:
Post a Comment