Tuesday, October 23, 2012

Sourdough Starter

A Sourdough starter is required for all sourdough recipes in this blog and probably existence.  I would be very cautious if I found a sourdough recipe without some form of starter.  Joe Ortiz's 'The Village Baker' has one such loaf.  He, however, essentially guides the reader through making a sourdough starter in a week.  You will have a better time if you make a sourdough starter before attempting to bake sourdough.


My sourdough starter is a varient of Chad Robertson's tartine sourdough starter.  It is characterized by daily feedings, no refrigeration, and volume on order 50 mL (3 tbspn) or order 60 g.  Here, I present a quick guide to sourdough starter.  For an objectively superior guide, see Francis-Olive.
If you have difficulty, try Pineapple.


Instructions:

Ingredients / Tools:

  • Whole wheat flour
  • Filtered / bottled water
  • Clean glass container
  • Spoon
  • Scale

 1.  Creating a Sourdough Starter

This took me over two weeks to compete.  Your patience will be rewarded.
  1. Pour 20-40 g water into the clean glass container.  A jar works very well.
  2. Pour equal amount by mass of flour.  Mix well.
  3. Lightly cover with towel or paper towel and place in a warm but not hot place (75-80 F is perfect).  I placed it on top of a refrigerator.
  4. Wait 2-3 days.  The mixture should smell a little ripe and bubbles should form on the outside.  If neither occurs, let it sit for another day or two.
  5. Discard most of the starter (Chad Robertson advises 80%) and replace with equal parts water and flour until you reach the same level.
  6. Repeat steps 3 through 5 until the starter "rises and falls".  
  7. Rises and falls implies the volume of the starter should at least double, then fall back to the same level.
  8. Once you have a starter that rises and falls reliably and smells sour, tangy and burns your nose if you sniff it when you first open the jar (like wasabi), you can start making a levain.

 2. Feeding a Sourdough Starter

I do this every day.  It takes less than 2 minutes if everything is set up.  
  1. Feed your starter when it has fallen (gone back to the original volume.  If you feed too early, your starter will lack the speed and force that you desire.  You would need to wait longer for the next feeding.  If you need to feed earlier, leave more of the original starter.
  2. Remove most of the starter and discard.  Most implies over 90%.
  3. Replace the removed starter with equal parts water and flour.  Mix well.  It should form a thick paste.  The texture is similar to pudding with chunks.  I keep my starter as liquidy as possible while still holding a peak after I stop stirring.
  4. Wait 16-24 hours.  
  • Feed more often when it is warmer.
  • Feed more often if you use white flour or wheat flour without as much bran or other complex starches
  •  Glass works best for the starter.  Chad Robertson says that plastic tubs are okay.  My plastic ones did not start growing until a few days after my glass ones.  I started my glass ones after the plastic ones.
  • Place the starter in a warm place if you want to have more activity.  Placing them in a cool (shaded) place will slow them down slightly
  • I have placed starters in a refrigerator for 3 weeks and revived the starter successfully.  It takes 2-3 days before the starter wakes up and is able to produce bread.  I like to discard only 75-80% of the starter when I try and wake it up.  
  • WARNING! Do not leave your starter mostly empty for extended periods (>6 hr).  I left mine at around 10% of normal for half a day and it took over a week of daily feedings to recover.

If you have difficulty creating a starter, read the Pineapple juice trick linked at the top.  I used a variant of that to create my first starter.  I happened to have pure citric acid on hand.  It must have been the right kind because my starter activated a few days after I treated my starter with citric acid.

If you want to see what a sourdough starter looks like in a warm environment, see Francis-Olive's Tartine bread experiment at the top.  My starters never look as active as hers.  My levains resemble her starters at times.

Do not be disappointed if your starters are not as strong as those you see on the Internet.  Mine took almost 8 months to produce good bread.  It still does not froth or foam as much as other peoples' starters.

Sunday, September 23, 2012

Disclaimer, Resources, etc

Creddit: Muhammad Mahdi Karim by way of wikipedia

Disclaimers:

All sourdough recipes are modified from Chad Robertson's Tartine Bread.  Chad Robertson operates a bakery out of San Francisco.  The SF Chronicle has an infectious video about Chad Robertson's bakery.  Please support Chad Robertson by buying his book and bread.

Sourdough Recipes modified from Chad Robertson's Tartine Bread:
  • Tartine Baguette
  • Tartine Brioche
  • Tartine Country Loaf
  • Tartine Croissant


I am not a baker.  My advice is no substitute for professional instruction.  At very best, my guide is a first order approximation to Chad Robertson's magnificent book.  It is accurate for me, but good only around my neighborhood.

Resources:

For Sourdough Bread:

Flour


Choose your flour carefully; it is the most important part of bread baking.  I have explored many flours over my time as a baker.  Here, I list and analyze each flour by type considering price, usage, and ease of purchase.

White Flour: 


Central Milling Company Organic Unbleached All Purpose

  •  Intermediate cost:
    • 20 lbs / $12 = 1.67 lbs/usd
    • ~ $0.66 / large tartine country loaf
    • ~ $0.44 / small tartine country loaf
  • Excellent flour for bread and pastry
  • Purchased at: Costco in Mountain View or Santa Clara
  • Conclusion: My favorite all purpose flour for the price.  Best value for the quality. 

Con Agra Harvest White All Purpose

  • Inexpensive 
    • 25 lbs / $8 = 3.13 lbs/usd
    • ~ $0.35 / large tartine country loaf
    • ~ $0.24 / small tartine country loaf
  • Suitable for quick yeasted breads (Jim Lahey's no kneed)
  • Purchased at: Any Costco
  • Conclusion: A good introductory flour for a beginning baker.  I learned on this flour

Con Agra Harvest White Bread

  • Inexpensive
    • 25 lbs / $8 = 3.13 lbs/usd
    • ~ $0.35 / large tartine country loaf
    • ~ $0.24 / small tartine country loaf
  • Very suitable for quick yeasted breads
  • Purchased at: Any Costco
  • Conclusion: A very good bread flour for a beginning baker.

Giusto Vita-grain Organic Unbleached All Purpose Baker's Choice

  • Expensive
    • 100 lbs / $91 = 1.11 lbs/usd
    • ~ $1.00 / large tartine country loaf
    • ~ $0.67 / small tartine country loaf
  • Absolutely exceptional bread flour with 11.5 % protein.
  • Develops gluten far superior to KA AP and slightly superior to KA bread.
  • Purchased at: Speciality organic food stores (IV Co-op)
  • Conclusion:  My favorite bread flour.  I cannot recommend it enough. The only disadvantage to this flour is that it is rather hard to find a vendor.  The IV Co-op sells it in 25 lb bags or 50 lb bags if you special order it.  Lazy acres refused to sell me the flour.  I have not found another vendor.

King Arthur Unbleached All Purpose

  • Expensive 
    • 5 lbs / $5 = 1.00 lbs/usd
    • ~ $1.10 / large tartine country loaf
    • ~ $0.73 / small tartine country loaf
  • Exceptional all purpose flour with 11.7 % protein
  • Exceptional for pastry and tart crust but not as good for bread as King Arthur bread flour
  • Purchased at: Most supermarkets (Albertsons, Vons, Safeway, Lazy Acres, Whole Foods)
  • Conclusion: If you are serious about baking, use flour for other purposes than bread, and do not want to stock both bread and AP flour, this is the flour for you.

King Arthur Unbleached Bread

  • Expensive (5 lbs / $5 = 1.00 lbs/usd)
    • 5 lbs / $5 = 1.00 lbs/usd
    • ~ $1.10 / large tartine country loaf
    • ~ $0.73 / small tartine country loaf
  • Exceptional bread flour with 12.7% protein.
  • Soft, stable mixes well
  • Purchased at: Most supermarkets (Albertsons, Vons, Safeway, Lazy Acres, Whole Foods)
  • Conclusion:  Top tier bread flour.  Makes exceptional bread.  Every time I need flour on short order, I buy KA bread flour.  It feels almost the same as Giusto AP.


Wheat Flour:


 Golden Temple Durum Atta:

  • Inexpensive
    • 20 lb for $10 = 2 lb / usd
  • I have only used this flour for yeasted whole wheat (~1/4 whole wheat), sourdough starter, and dusting.  
  • The flour is exceptional at dusting.  I dust all my cloths, bowls, and pots with this flour.  Things stick less to this flour.
  • It is perfect for a lazy man's sourdough starter.  There is enough complex starches to keep the starter busy for an entire day in warm weather.  When I ran out and had to switch to white flour or even Trader Joe White Wheat, the starter needed to be changed much more often.  I have fed my starter with this for 6 months with no negative side effects.
  • Purchased at: Costco in Santa Clara or an Indian food store.
  • Conclusion: I highly recommend this flour for dusting and sourdough starter.

King Arthur Whole Wheat:

  • Expensive
    • 5 lb for $5 = 1 lb / usd
    • ~ $1.10 / large tartine country loaf
    • ~ $0.73 / small tartine country loaf 
  • KA whole wheat is an excellent whole wheat bread flour.  If I make whole wheat bread (~100% whole wheat), I use predominately this flour.
  • It's price demands I not use this flour unless I can taste it (starter, levain, white loaves)
  • Starters do love KA wheat.
  • Purchased at: Most supermarkets (Albertsons, Vons, Safeway, Lazy Acres, Whole Foods)
  • Conclusion: The best whole wheat flour I have found for bread.  Feeding a starter with it is a waste of money.

Stone-Buhr Whole Wheat:

  • Expensive
    • 5 lb for $5 = 1 lb/usd
    • ~ $1.10 / large tartine country loaf
    • ~ $0.73 / small tartine country loaf
  •  A very chewy flour with lots of large wheat particles.
  •  Difficult to use in a bread by itself.  It feels like there are large grains of sand in your flour mix.  
  • It is good in mixes with good white bread flour (1:1 mixes).
  • Purchased at: Some specialty supermarkets.
  • Conclusion: A good hardy flour with lots of texture. Difficult to use alone.  A waste compared to KA wheat.

Trader Joe White Whole Wheat:


  •  Inexpensive
    • 5 lb for less than $3 < 1.66 lb / usd
  • A perfect flour to add to white loaves.  
  • Whenever I add flour to white loaves, I increase the amount of wheat flour by 70 to 150 % and use Trader Joe's White Wheat.  It adds gluten and texture.
  • Make sure to mix this with other flours.  It has a similar grainy feeling as Stone-Buhr's wheat.
  • Perfect for levains.
  • Purchased at: Trader Joes
  • Conclusion: I always have a bag of this around the house.  I use it in every bread I bake.  I use it in every levain I make.  Some brioche and croissant receive all white levains, though.

 Rice Flour:

  • Inexpensive (if found in the correct store)
    • 1lb for $0.79 = 1.26 lb/usd
  • You only need a spoonful per tartine loaf for dusting the cloth, so this lasts quite a while.
  • While not necessary, I strongly recommend it for dusting.  Your bread will stick much less if you use it.  Refrigeration also helps.
  • Try to avoid sweat rice flour.  It is sticker and hence defeats the purpose of using rice flour.
  • Try and purchase from an Asian store.  It is less expensive.
  • Purchase at: Asian stores, Chinese stores, most supermarkets (expensive)
  • Conclusion: Any rice flour will do.  At less than 1/2 teaspoon per loaf, do not worry about the quality or taste.

Tartine Country Loaf


The Tartine Country Loaf is as much a versatile bread as a road map to sourdough bread in general.  Every recipe of sourdough in Chad Robertson's, and by extension my, repertoire seem to use the same basic formula as his Tartine Country Loaf.  He spends over 40 pages in his book describing how to make it and references it in all his following recipes.  One should read through this recipe before attempting other sourdough bread recipes.


Tasting and Pairing Notes:
  • Thick, dark, crunchy, 'shattery' crust
  • Chewy interior with large unevenly uniform crumb
  • Pairs exceptionally with cheeses, fresh salad, roasted vegetables, steak, beef stews


 Instructions:

Makes 2 large loaves or 3 small loaves.
Minimum time:  6hr after levain

Ingredients:

  • 1 kg flour 
  • 200 g levain
  • 770 g water
  • 15 g salt  

Tools: 

  • 2 large mixing bowls, 1 medium size mixing bowl
  • Scale  (1g precision, 1 kg capacity)
  • 1 large container for proof (plastic or glass is best)
  • Surface to roll out (wood is easiest, but make SURE it is clean.  A table is probably not clean enough) 
  • Bench knife (very strongly recommended unless using low hydration) 
  • 1 basket or bowl per loaf
  • One kitchen towel per loaf 


1.  Making the dough: 

The important part is the proportions and making sure all the flour is incorporated.  The instructions give an easy and quick way of doing so.


Combine all flours in a large mixing bowl.  Mix well.  Put to one side.

Measure water using smaller bowl.  Transfer to empty large bowl

Add all of levain to large bowl containing water(or most if you want to keep some for the next starter) and mix well by hand.  No levain should be visible.

Add flour mixture to water.  Do not mix.  Let mixture sit for 1-5 minutes, then mix in light circular motions with fingers in a claw shape.  Most of the mixing is done by the wrist.

When a good amount of the flour has been mixed in but the bottom of the bowl is still fully liquid, scrape the edges of the bowl and incorporate the flour build up.

Continue this process until all the flour is incorporated.  Squeeze it through your fingers to make sure there are NO dry bits.

Give the dough a rough turn if you feel the need.  Turns are addressed in detail in part 2.  Basically, dig your hand under the dough and stretch it up and over.  

Let sit for 30-60 minutes.

Add salt and 50 g water to the bowl and incorporate.

Give the dough another rough turn.


2.  Bulk Fermentation:


We develop the gluten here.  This is the most important step and the one that will determine if your bread is successful.  Chad Robertson gives a nice description, nothing is a substitute for experience.  Until then, experimentation is the easiest path to success.


The following instructions are for a single turn.  Perform a turn every half hour for the first 2 hours ( 4 turns) then let the dough sit for 30-60 minutes.  Times are approximate; the feel is the important part.

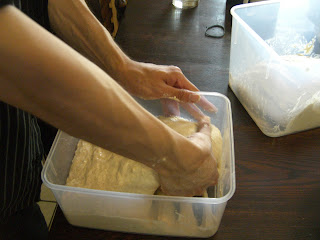
Dig your hand under the dough.  Do not penetrate the center: go from the edges.

Working quickly and decisively, lift and stretch the dough as high as you are comfortable and gently lay it over the other half that stayed in the container.  If the dough was too stiff, pulling helps.  If the dough is too wet, moving quicker helps.  If the dough is too tacky / sticky, let if rest for longer in part 1.

Repeat the turn five or six times as you work around the dough.  The dough should become harder and harder to stretch.  Stop when you can no longer stretch the dough.  

Be as gentle as possible.  As you perform more turns, be more gentle.  
When the dough feels lighter than before, you know you are close to finishing.
If you use a transparent container, you should see little bubbles on the sides.

If you want to add flax seeds, olives, herbs, etc, add them in the 1st or 2nd turn.  Make sure they are combined well and dry when they go in.  

1 - 1.5 c flax seeds is a good amount with whole wheat bread.


3. Dividing and Shaping, Part 1: 


This will determine how pretty your loaves look.  Proper shaping can save the appearance of poorly fermented dough.  Poor shaping will result in flat, structureless dough with an uninteresting crumb.  Do not be too alarmed if your loaves are not perfect here; there is still another set of shaping to go.  The better your initial shape, however, the easier your real shape will be.


Very gently allow the dough to fall out of the container onto your surface.  If you are using wood or smooth stone, no need to flour the surface.

Using a bench knife, divide the mass of dough into two (or three if you want tiny loaves or if you added other ingredients during bulk fermentation).

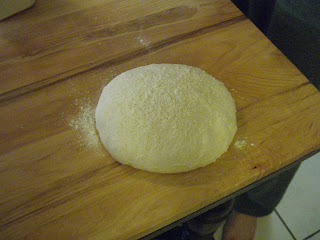
Take one part.  With the short side closest to you, fold the top third down towards you.  Fold the bottom third up over that.  Fold the right and left thirds likewise to the center and roll the dough onto your surface so the seam side is down.

Rotate the dough mound using the bench knife and your hands.  Be decisive; the bread can sense your fear and responds by becoming stickier.  

Rotate until the dough forms roughly circular mounds (circular in xy plane)
You may add a tiny amount of flour before you flip the dough if you are not using a wooden or stone surface.

Repeat for all other partitions of the dough.

Let the dough sit without cross breezes for 30-60 minutes.  Do not cover unless there is a stiff wind or your room is dry; you want a slight hint of a crust to form to aid in the next step.


4.  Dividing and Shaping, Part 2:


We now build the tension and structure that forms the bread's scaffolding.  A well shaped bread will rise better and give a more pronounced ovan spring.  Make sure to work quickly and decisively.  The bread can sense your fear.

Prepare baskets or bowls for bread, one per loaf.

Place towel inside basket.  Flour with course flour (indian wheat flour is a good choice) and rice flour in roughly equal proportions.


Rub the flour into the towels.


Make sure to work quickly.  If you move too slow, you will need to add flour to prevent the dough from sticking.

If need be, flour the top surface of the dough.

Using the bench knife, free the dough from the bottom surface.  Move quickly and try to keep the loaves in circular forms.

Flip the dough onto the surface such that the seam in now face up.

Fold the bottom third up, the right third over that and to the left, and the left side over those and to the right.  Stretch a fair amount; do not tear the dough.

Fold the top third down and the bottom third (not including the top third) over all of that.  Pull and flip the dough such that the seam side is down.

This is the outer crust.  You may now add as much flour as you desire.

Rotate and push and pull the dough on the surface.  Try and build as much tension as possible in the surface of the dough. Be careful not to break the surface.  

Repeat on all loaves.  Dust all well with flour

Place loaves seam side up into the baskets.  The seams should be barely visible.  Dust well with flour and cover


5.  Final Proof and Baking:


The final proof is very flexible.  My final proofs range from 1.5 hours at room temperature to 24 hours with refridgeration.  If you remember how the dough feels and how it turns out, you will drift towards the correct times. 


Let loaves rise for 2-4 hours at room temperature or 3-12 hours in the fridge.  It is useful to place the loaves in the fridge for 30-60 minutes before baking to develop a firm crust that makes scoring orders of magnitude easier.

To bake, place pots in the oven and pre-heat to 450-485.  If convection bake, 450 is hot enough.

When oven and pots are very hot, take pots out.  Flour the bottom very well.  If you do not, the bread will stick to the bottom of the pots.  If your pots are hot enough, the flour should start to smoke slightly.

Quickly flip the bread into the pots, seam side is now down.

Slice a pattern into the bread using a sharp knife (serrated is better if you do not have a very sharp one) or a razor blade (preferable).

Place the lid back on and put into the oven.

20 minutes cover on, 20 minutes cover off.  Keep baking until the bread reaches the desired color.

When you take the bread out, make sure to scrape off the flour from the bottom before you serve.  It is good to wait 10-30 minutes before slicing into the bread, but it is not strictly necessary.  The texture changes considerably if you do not wait (more custardy, less chewy).


Levain and Poolish

Making levains and poolishes are the first step to making a loaf of bread in Chad Robertson's tartine method.  Essentially, a levain is a large sourdough starter that is used before it becomes sour or pungent.  A poolish is an artifical yeast levain.  Half to a whole levain is required for all recipies. 

Instructions:

Ingredients:

For Levain:
  • ~220 g flour
  • ~250 g water
  • ~25 g ripe starter
 For Poolish:
  • ~200 g flour
  • ~220 g water
  • ~3 g dry yeast

Tools:

  • Spoon for mixing
  • Containers for levain and poolish
  • Scale

1. Making a Levain

  1. Add starter to container
  2. Add water to container.  Mix very well.
  3. Add flour to container.  Mix very well.
  4. Wait 8-12 hours.  Levain is ready when a small spoonful floats in water (known as the float test)

2. Making a Poolish

  1. Add yeast to container
  2. Add water to container.  Mix very well.
  3. Add flour to container.  Mix very well.
  4. Wait 3-5 hours or until it passes the float test.
  5. Or, wait 8-12 hours in the fridge.

Notes:

  • I advise covering the levain and poolish with saran wrap and fastening it with a rubber band. If your container is too small or you added too much flour, the levain will overflow and create a large mess.
  • Chad Robertson advises equal proportions flour to water.  I add more water to reduce the chance of the levain and poolish overflowing.  This is doubly so with the poolish.  They expand considerably (~100%)
  • If you have a weak levain even after 12 hours, your starter is probably not strong enough.  Do not expect bread with an open crumb.
  • Your bread will smell and taste like your levain.  If you let your levain sit for too long, it will become sour, bitter, and ascerbic.  Your bread will have those characteristics.  A sweet, milky levain is ideal, expecially for enriched breads (croissant, brioche).